
はじめに
前回は、何でもセグメンテーションが可能な segment-anything について説明しました。

今回は Transformer を用いたインスタンスセグメンテーションが可能な Mask2Former について説明します。
前提条件
前提条件は以下の通りです。
- Ubuntu == 22.04 (WindowsはDetectron2が使用できないので不可)
- Python == 3.10.6
- torch == 1.13.1, torchvision == 0.14.1
- detectron2 == 0.6
- 学習する場合は GPU 10GB 以上必要
今回は(おそらく) Ubuntu でしか使用できないAIとなります。
Detectron2 のインストールはこちらの記事を参考にしてください。
Mask2Former のインストール
まずは、github からダウンロードします。
git clone https://github.com/facebookresearch/Mask2Former.git次に、必要なライブラリをインストールします。
cd Mask2Former
python3 -m pip install -r requirements.txt
次に、カスタムアテンションレイヤーをインストールします。
cd mask2former/modeling/pixel_decoder/ops
./make.sh
ここで、エラーが出ると思います。
make.sh を以下のように変更してください。
#!/usr/bin/env bash
# ------------------------------------------------------------------------------------------------
# Deformable DETR
# Copyright (c) 2020 SenseTime. All Rights Reserved.
# Licensed under the Apache License, Version 2.0 [see LICENSE for details]
# ------------------------------------------------------------------------------------------------
# Modified from https://github.com/chengdazhi/Deformable-Convolution-V2-PyTorch/tree/pytorch_1.0.0
# ------------------------------------------------------------------------------------------------

# Copyright (c) Facebook, Inc. and its affiliates.
# Modified by Bowen Cheng from https://github.com/fundamentalvision/Deformable-DETR

python3 setup.py build install --user
–user 引数を付与して、スーパーユーザー権限を不要にします。
再度、以下を実行してください。
./make.shこれでインストールは完了です。
AIモデルのダウンロード
モデルはこちらからダウンロードします。
以下の画像の、青丸からダウンロードしてください。
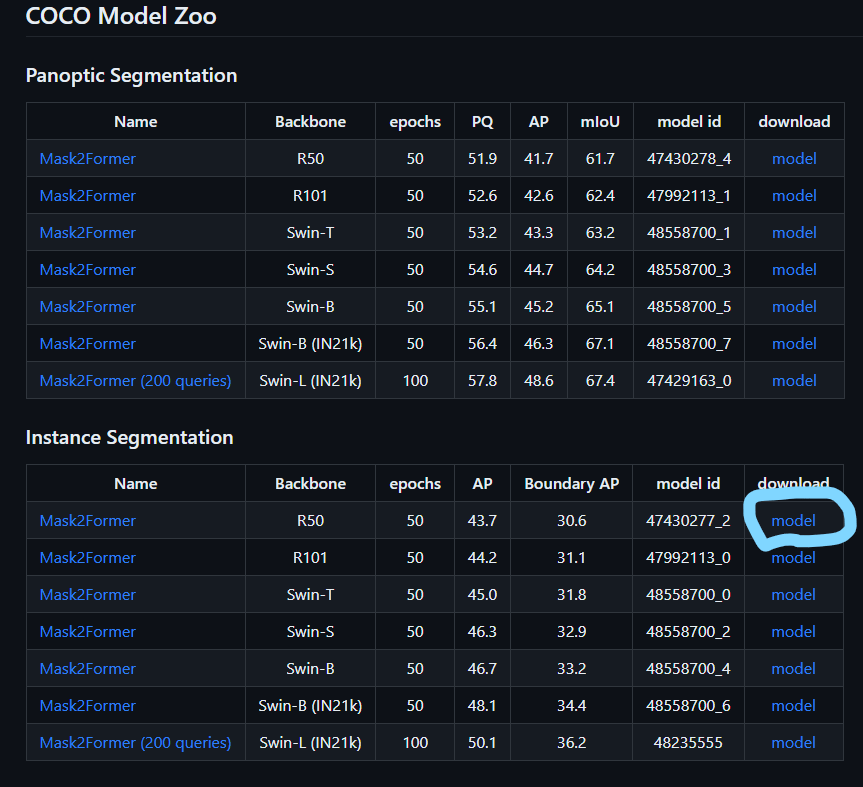
Mask2Former/weights/model_final_3c8ec9.pkl として保存してください。
推論デモプログラムの実行
それでは、推論プログラムを実行していきます。
demo フォルダに移動してください。
cd Mask2Former/demo
wget http://images.cocodataset.org/val2017/000000005477.jpg -q -O input.jpg
そして、以下のコマンドを実行します。
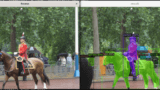
python3 demo.py --config-file ../configs/coco/instance-segmentation/maskformer2_R50_bs16_50ep.yaml --input ./input.jpg --opts MODEL.WEIGHTS ../weights/model_final_3c8ec9.pkl上記を実行すると、以下の画像が表示されます。
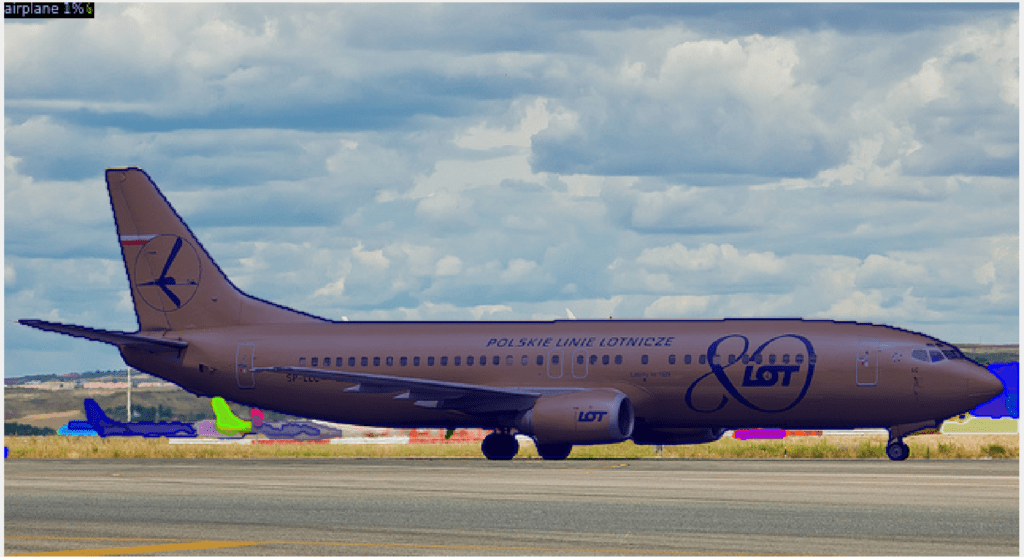
無事に推論できています!
プログラムの説明
demo.py を見ていきます。
if __name__ == "__main__":
    mp.set_start_method("spawn", force=True)
    args = get_parser().parse_args()
    setup_logger(name="fvcore")
    logger = setup_logger()
    logger.info("Arguments: " + str(args))

    cfg = setup_cfg(args)

    demo = VisualizationDemo(cfg)

    if args.input:
        if len(args.input) == 1:
            args.input = glob.glob(os.path.expanduser(args.input[0]))
            assert args.input, "The input path(s) was not found"
        for path in tqdm.tqdm(args.input, disable=not args.output):
            # use PIL, to be consistent with evaluation
            img = read_image(path, format="BGR")
            start_time = time.time()
            predictions, visualized_output = demo.run_on_image(img)
            print(predictions["instances"].scores)
            logger.info(
                "{}: {} in {:.2f}s".format(
                    path,
                    "detected {} instances".format(len(predictions["instances"]))
                    if "instances" in predictions
                    else "finished",
                    time.time() - start_time,
                )
            )

            if args.output:
                if os.path.isdir(args.output):
                    assert os.path.isdir(args.output), args.output
                    out_filename = os.path.join(args.output, os.path.basename(path))
                else:
                    assert len(args.input) == 1, "Please specify a directory with args.output"
                    out_filename = args.output
                visualized_output.save(out_filename)
            else:
                cv2.namedWindow(WINDOW_NAME, cv2.WINDOW_NORMAL)
                cv2.imshow(WINDOW_NAME, visualized_output.get_image()[:, :, ::-1])
                if cv2.waitKey(0) == 27:
                    break  # esc to quit
推論部分は Detectron2 とほとんど同じです。
119行目の
predictions, visualized_output = demo.run_on_image(img)の predictions[“instances”] に pred_boxes, pred_masks, scores, pred_classes が格納されているので、これらを使用することができます。
visualized_output.get_image()[:, :, ::-1] で、マスクされた入力画像を取得できます。
ベストスコアとそのクラスの取得方法は以下となります。
predictions, visualized_output = demo.run_on_image(img)
best_score_arg = np.argmax(predictions["instances"].to("cpu").scores.numpy())
best_score = predictions["instances"].to("cpu").scores.numpy()[best_score_arg]
cls_number = predictions["instances"].to("cpu").pred_classes.numpy()[best_score_arg]
print(cls_number, best_score)
これで取得可能です。
np.argsort を使用すれば、top_K の取得も簡単になります。
おわりに
今回は Mask2Former の推論方法について説明しました。
Transformer は流行なので、推論速度や精度にも注目していきたいです。
今のところ、学習にはかなり時間がかかりそうです…
次回は、Mask2Former の学習方法について説明します。


コメント