
はじめに
前回は Yolact-Edge について、学習方法と推論方法にてついて説明しました。

今回は次世代AIライブラリである Detectron2 について、その推論方法を説明していきます。
主にセグメンテーションのライブラリとなります。
あとで掲載しますが、detectron2 の github を参考にしています。
前提条件
前提条件は、以下の通りです。
- OS は Linux または、WSL2
- Python >= 3.7 ※3.8.10を使用します。
- PyTorch == 1.11.0+cu113 ※ バージョンを合わせる必要があります。
- OpenCV >= 4.5 ※4.5.5を使用します。
- CUDA-Toolkit == 11.3.1
Detectron2 をインストール
早速、Detectron2 をインストールしていきます。
こちらを参考に、進めていきます。
cd ~/
python3 -m pip install detectron2 -f https://dl.fbaipublicfiles.com/detectron2/wheels/cu113/torch1.10/index.html
上記を実行するだけで、インストールできます。
続いて、github からデモプログラムを取得します。ついでに、画像データも取得します。
mkdir ~/detectron2-dev
cd ~/detectron2-dev
git clone -b v0.6 https://github.com/facebookresearch/detectron2.git
cd detectron2/demo
wget http://images.cocodataset.org/val2017/000000439715.jpg -q -O input.jpg
Detectron2 で推論を実行する準備
早速、推論を実行していきます。
まずは、デモプログラムから動かしていきます。
cd ~/detectron2-dev/detectron2/demo
python3 demo.py --config-file ../configs/COCO-InstanceSegmentation/mask_rcnn_R_50_FPN_3x.yaml --input input.jpg --opts MODEL.WEIGHTS detectron2://COCO-InstanceSegmentation/mask_rcnn_R_50_FPN_3x/137849600/model_final_f10217.pkl
以下のような出力があれば、成功です。

ターミナルには
[11/15 22:01:24 detectron2]: input.jpg: detected 15 instances in 1.02sこのように、推論速度も表示されていると思います。
Detectron2 の推論
こちらを参考に進めていきます。
cd ~/detectron2-dev/detectron2/demo
touch detectron_test.py
code .
起動した VSCode で、detectron_test.py に以下の内容を記載します。
import torch, detectron2
TORCH_VERSION = ".".join(torch.__version__.split(".")[:2])
CUDA_VERSION = torch.__version__.split("+")[-1]
print("torch: ", TORCH_VERSION, "; cuda: ", CUDA_VERSION)
print("detectron2:", detectron2.__version__)

# Some basic setup:
# Setup detectron2 logger
import detectron2
from detectron2.utils.logger import setup_logger
setup_logger()

# import some common libraries
import numpy as np
import os, json, cv2, random

# import some common detectron2 utilities
from detectron2 import model_zoo
from detectron2.engine import DefaultPredictor
from detectron2.config import get_cfg

from detectron2.utils.visualizer import Visualizer
from detectron2.data import MetadataCatalog, DatasetCatalog

print("start")
# display test image
im = cv2.imread("./input.jpg")
print(im.shape)
cv2.imshow("frame", im)


cfg = get_cfg()
# add project-specific config (e.g., TensorMask) here if you're not running a model in detectron2's core library
cfg.merge_from_file(model_zoo.get_config_file("COCO-InstanceSegmentation/mask_rcnn_R_50_FPN_3x.yaml"))
cfg.MODEL.ROI_HEADS.SCORE_THRESH_TEST = 0.5  # set threshold for this model
# Find a model from detectron2's model zoo. You can use the https://dl.fbaipublicfiles... url as well
cfg.MODEL.WEIGHTS = model_zoo.get_checkpoint_url("COCO-InstanceSegmentation/mask_rcnn_R_50_FPN_3x.yaml")
predictor = DefaultPredictor(cfg)
outputs = predictor(im)

print(outputs["instances"].pred_classes)
print(outputs["instances"].pred_boxes)


v = Visualizer(im, MetadataCatalog.get(cfg.DATASETS.TRAIN[0]))
out = v.draw_instance_predictions(outputs["instances"].to("cpu"))
cv2.imshow("result", out.get_image())

cv2.waitKey(0)
まずは、動かして結果を確認してみましょう。
python3 detectron_test.py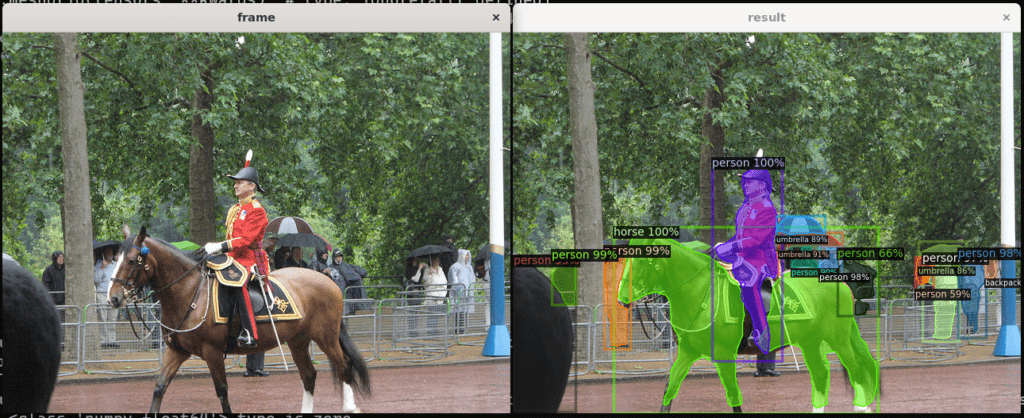
このように表示されれば問題ありません。
Detectron2 の推論コードを確認
コードを確認していきます。
im = cv2.imread("./input.jpg")
print(im.shape)
cv2.imshow("frame", im)
画像を読み込んで、画像サイズと画像を表示します。
cfg = get_cfg()
cfg.merge_from_file(model_zoo.get_config_file("COCO-InstanceSegmentation/mask_rcnn_R_50_FPN_3x.yaml"))
cfg.MODEL.ROI_HEADS.SCORE_THRESH_TEST = 0.5  # set threshold for this model
# Find a model from detectron2's model zoo. You can use the https://dl.fbaipublicfiles... url as well
cfg.MODEL.WEIGHTS = model_zoo.get_checkpoint_url("COCO-InstanceSegmentation/mask_rcnn_R_50_FPN_3x.yaml")
get_cfg クラスは、Detectron2 の設定用クラスです。簡単にデータローダーの作成や、モデルの読み込み、しきい値の管理等ができます。
今後、カスタムデータで学習する記事も出しますので、そちらでより細かい設定を見ていけたらと思います。
predictor = DefaultPredictor(cfg)
outputs = predictor(im)
DefaultPredictor は推論用のクラスです。こちらに先ほど作成した get_cfg のインスタンスを渡す必要があります。
PyTorch の model = torch.hub.load… みたいな使い方と考えてください。
predictor は DefaultPredictor のインスタンスで、predictor(opencv画像) で推論することができます。PyTorch の model(image) みたいな使い方ができます。というか、内部ではそうなっています。
print(outputs["instances"].pred_classes)
print(outputs["instances"].pred_boxes)
outputs の変数の中身を確認できます。
他にも、.scores や、.pred_masks も確認できます。
v = Visualizer(im, MetadataCatalog.get(cfg.DATASETS.TRAIN[0]))
out = v.draw_instance_predictions(outputs["instances"].to("cpu"))
cv2.imshow("result", out.get_image())
MetadataCatalog.get(cfg.DATASETS.TRAIN[0]) は、class や class_id が格納されています。使用するモデルによって変更していきます。
draw_instance_predictions は predictor の推論結果を使用して、画像にマスクや矩形を表示してくれます。非常に便利です。
自分で描画したい場合は、yolact-edge のコードが参考になると思います。
おわりに
今回は Detectron2 の推論方法と推論コードについて説明しました。
次世代AIライブラリなので非常に便利です。
使用できるモデルもかなり多くありますね。github で確認できます。
次回は、Detectron2 の他のモデルの使用方法か、訓練方法について説明します。

コメント