はじめに
今までは Yolov5 の学習と推論に関して記事を作成してきました。
実際に、画像認識を運用する際は引数でUSBカメラを使用するなんてプログラムは非常に手間です。
認識したクラスによって処理を変更したい場合もあると思います。
そこで、Yolov5 の detect.py のコードを、独自の処理を追加できるように変更していきます。
前提条件
前提条件は以下の通りです。
- numpy>1.22.0, opencv-python>4.5.0, pytorch>1.8.0 がインストールされている(CPUとGPUはどちらでも問題ありません)
- Visual Studio Code がインストールされている
- git がインストールされている
- コマンドはUbuntuのものですが、Windowsでもほとんど動作します(python3, pip3 → python, pip に置き換える必要があります)
Yolov5をダウンロードし、出力を確認する
まずは、Yolov5 を github からダウンロードします。
cd ~
mkdir yolov5-inference
cd yolov5-inference
git clone -b v6.2 https://github.com/ultralytics/yolov5.gitもしくはこちらのページから直接 zip をダウンロードしても問題ありません。
ダウンロードが完了したら、VSCode を開きます。
cd yolov5
code .
requirements.txt を以下のように書き換えます。
# YOLOv5 requirements
# Usage: pip install -r requirements.txt

# Base ----------------------------------------
matplotlib>=3.2.2
#numpy>=1.18.5
#opencv-python>=4.1.1
Pillow>=7.1.2
PyYAML>=5.3.1
requests>=2.23.0
scipy>=1.4.1
#torch>=1.7.0
#torchvision>=0.8.1
tqdm>=4.64.0
protobuf<=3.20.1  # https://github.com/ultralytics/yolov5/issues/8012

# Logging -------------------------------------
tensorboard>=2.4.1
# wandb
# clearml

# Plotting ------------------------------------
pandas>=1.1.4
seaborn>=0.11.0

# Export --------------------------------------
# coremltools>=5.2  # CoreML export
# onnx>=1.9.0  # ONNX export
# onnx-simplifier>=0.4.1  # ONNX simplifier
# nvidia-pyindex  # TensorRT export
# nvidia-tensorrt  # TensorRT export
# scikit-learn==0.19.2  # CoreML quantization
# tensorflow>=2.4.1  # TFLite export (or tensorflow-cpu, tensorflow-aarch64)
# tensorflowjs>=3.9.0  # TF.js export
# openvino-dev  # OpenVINO export

# Extras --------------------------------------
ipython  # interactive notebook
psutil  # system utilization
thop>=0.1.1  # FLOPs computation
# albumentations>=1.0.3
pycocotools>=2.0  # COCO mAP
# roboflow
ターミナルに戻って、以下のコマンドを実行します。
pip3 install -r requirements.txtインストールが完了したら、再度VSCodeに戻り、detect.pyを開いてください。
121行目 ~ 129行目が以下となります。
# Inference
visualize = increment_path(save_dir / Path(path).stem, mkdir=True) if visualize else False
pred = model(im, augment=augment, visualize=visualize)
t3 = time_sync()
dt[1] += t3 - t2

# NMS
pred = non_max_suppression(pred, conf_thres, iou_thres, classes, agnostic_nms, max_det=max_det)
dt[2] += time_sync() - t3
この部分だけで、推論と推論結果の整理は完了します。
あとは “pred” 変数の中身を処理するだけです。
その前に、入力データと出力データを確認してみましょう。以下のように変更してください。
# Inference
visualize = increment_path(save_dir / Path(path).stem, mkdir=True) if visualize else False
print("########################################")
print(im.shape, im.device, path)
pred = model(im, augment=augment, visualize=visualize)
t3 = time_sync()
dt[1] += t3 - t2

# NMS
pred = non_max_suppression(pred, conf_thres, iou_thres, classes, agnostic_nms, max_det=max_det)
print(len(pred[0]), pred[0].device, pred)
print("########################################")
dt[2] += time_sync() - t3
推論を実行します。
python3 detect.py#で囲まれた出力部分を確認してください。2つあると思いますが、そのうち1つを載せます。
########################################
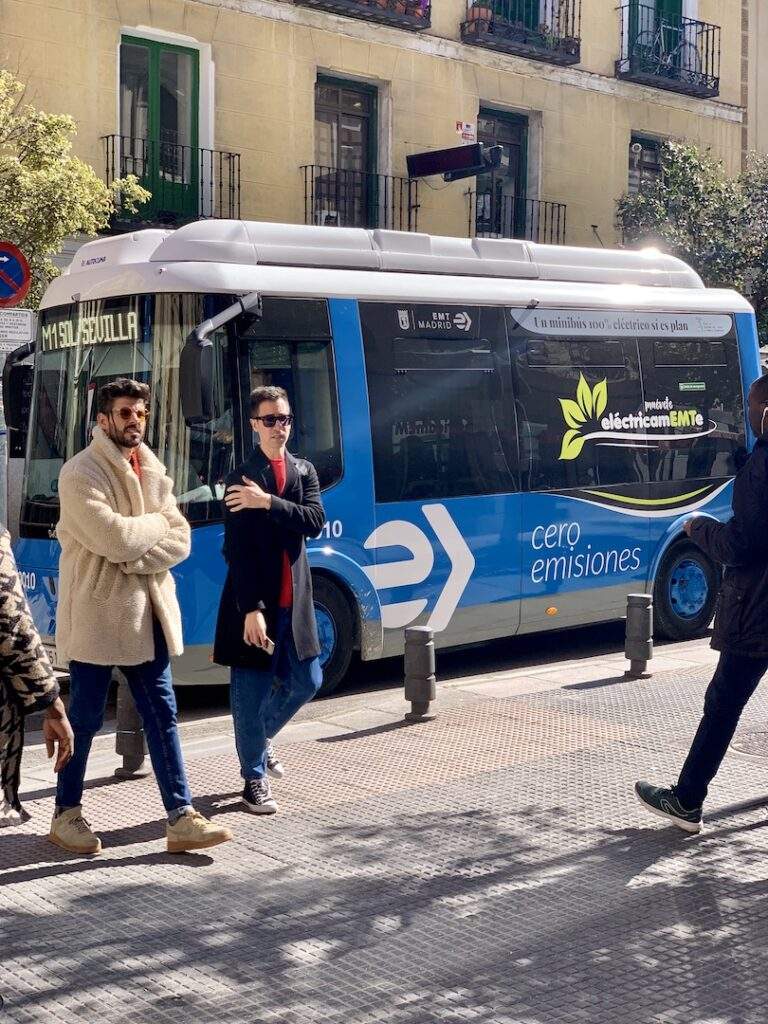
torch.Size([1, 3, 640, 480]) cuda:0 /home/user/yolov5-inference/yolov5/data/images/bus.jpg
5 cuda:0 [tensor([[3.98122e+02, 2.34289e+02, 4.80183e+02, 5.20505e+02, 8.96175e-01, 0.00000e+00],
[1.30765e+02, 2.41859e+02, 2.05140e+02, 5.14016e+02, 8.70215e-01, 0.00000e+00],
[2.91890e+01, 2.31127e+02, 1.47021e+02, 5.40705e+02, 8.51534e-01, 0.00000e+00],
[7.47591e+00, 1.32372e+02, 4.79840e+02, 4.67331e+02, 8.49352e-01, 5.00000e+00],
[2.56596e-02, 3.27353e+02, 4.02252e+01, 5.18736e+02, 5.35427e-01, 0.00000e+00]], device='cuda:0')]
########################################imの変数に関して、torch.Size([1, 3, 640, 480]) は PyTorch のTensor型を表します。
この場合、バッチサイズ1のカラー(RGB)で640×480の画像が変数に格納されています。
そして、GPUを使用している場合はcuda:0と表示されます。
/home/user/yolov5-inference … は推論に使用した画像のパスになります。
出力結果は runs/detect/exp にあります。
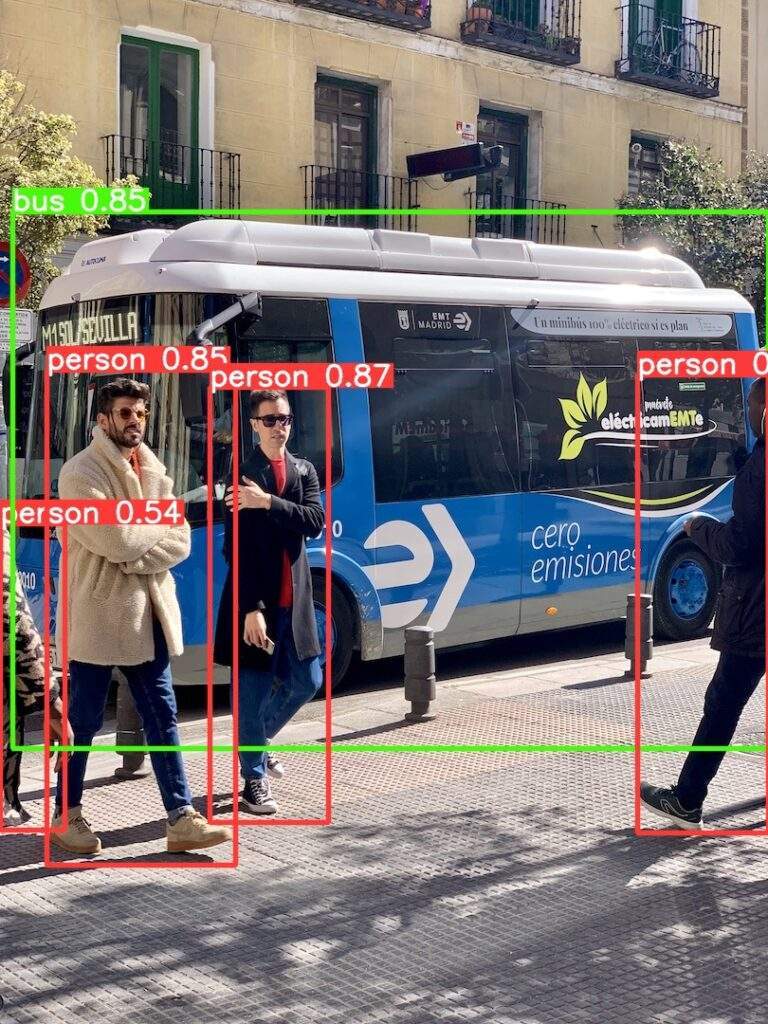
pred[0]変数は長さ5のリストで構成されています。
5つ検出したので、長さ5です。10個検出したら長さが10になります。
リストの中身を見ていきます。
[3.98122e+02, 2.34289e+02, 4.80183e+02, 5.20505e+02, 8.96175e-01, 0.00000e+00]
[矩形の左上X座標, 矩形の左上Y座標, 矩形の右下X座標, 矩形の右上y座標, 確度, クラス番号]
のように、構成されています。
クラス番号の対応表は data/coco128.yaml をご確認ください。
以下のような部分があると思います。
names: ['person', 'bicycle', 'car', 'motorcycle', 'airplane', 'bus', 'train', 'truck', 'boat', 'traffic light',
        'fire hydrant', 'stop sign', 'parking meter', 'bench', 'bird', 'cat', 'dog', 'horse', 'sheep', 'cow',
        'elephant', 'bear', 'zebra', 'giraffe', 'backpack', 'umbrella', 'handbag', 'tie', 'suitcase', 'frisbee',
        'skis', 'snowboard', 'sports ball', 'kite', 'baseball bat', 'baseball glove', 'skateboard', 'surfboard',
        'tennis racket', 'bottle', 'wine glass', 'cup', 'fork', 'knife', 'spoon', 'bowl', 'banana', 'apple',
        'sandwich', 'orange', 'broccoli', 'carrot', 'hot dog', 'pizza', 'donut', 'cake', 'chair', 'couch',
        'potted plant', 'bed', 'dining table', 'toilet', 'tv', 'laptop', 'mouse', 'remote', 'keyboard', 'cell phone',
        'microwave', 'oven', 'toaster', 'sink', 'refrigerator', 'book', 'clock', 'vase', 'scissors', 'teddy bear',
        'hair drier', 'toothbrush']  # class names
“person” がクラスラベル0、”bus” は、クラスラベル5となります。
Yolov5の推論結果によって、処理を分ける
ここまできたら、あとは pred[0] の変数を処理するだけです。
forループで回せば解決です。
まずは、135 ~ 217 行目をコメントアウトしてください。
134行目から、追記していきます。
pred = pred[0].cpu().detach().numpy()
for p in pred:
    box_lx = int(p[0])
    box_ly = int(p[1])
    box_rx = int(p[2])
    box_ry = int(p[3])
    conf = p[4]
    classvalue = int(p[5])

    if classvalue == 0:
        print("detect person")
出力は以下のようになります。
########################################
torch.Size([1, 3, 640, 480]) cuda:0 /home/user/yolov5-inference/yolov5/data/images/bus.jpg
5 cuda:0 [tensor([[3.98122e+02, 2.34289e+02, 4.80183e+02, 5.20505e+02, 8.96175e-01, 0.00000e+00],
        [1.30765e+02, 2.41859e+02, 2.05140e+02, 5.14016e+02, 8.70215e-01, 0.00000e+00],
        [2.91890e+01, 2.31127e+02, 1.47021e+02, 5.40705e+02, 8.51534e-01, 0.00000e+00],
        [7.47591e+00, 1.32372e+02, 4.79840e+02, 4.67331e+02, 8.49352e-01, 5.00000e+00],
        [2.56596e-02, 3.27353e+02, 4.02252e+01, 5.18736e+02, 5.35427e-01, 0.00000e+00]], device='cuda:0')]
########################################
detect person
detect person
detect person
detect person
これで、”person” を検知した場合にコンソールに “detect person” と処理を追加することができました。
おわりに
Yolov5 にコードを追記して推論しました。
これで、画像検査や、型式検査に応用することができます。
今後はdetectron2 もしくは yolact についても同様の記事を書いていけたらと思います。

コメント