はじめに
前回は anomalib のデモを試しました。
今回は、カスタムデータで学習する方法について説明していきます。
anomalib の github はこちらです。
前提条件
前提条件は以下の通りです。
- torch == 1.12.1+cu113
- pytorch_lightning == 1.9.5
カスタムデータの準備
カスタムデータは、以前の FastFlow の記事を参考に用意しました。
test, train フォルダを datasets/MVTec/custom フォルダへ保存します。
config.yaml の編集
次に、src/anomalib/models/padim/config.yaml を編集していきます。
dataset:
  name: custom
  format: folder
  path: ./datasets/MVTec/custom
  # category: custom
  normal_dir: train/good
  normal_test_dir: test/good
  abnormal_dir: test/defect
  mask_dir: null
  extensions: null
  # task: segmentation
  task: classification
  train_batch_size: 8
  eval_batch_size: 8
  num_workers: 2
  image_size: 256 # dimensions to which images are resized (mandatory)
  center_crop: null # dimensions to which images are center-cropped after resizing (optional)
  normalization: imagenet # data distribution to which the images will be normalized: [none, imagenet]
  transform_config:
    train: null
    eval: null
  test_split_mode: from_dir # options: [from_dir, synthetic]
  test_split_ratio: 0.1 # fraction of train images held out testing (usage depends on test_split_mode)
  val_split_mode: same_as_test # options: [same_as_test, from_test, synthetic]
  val_split_ratio: 0.1 # fraction of train/test images held out for validation (usage depends on val_split_mode)
  tiling:
    apply: false
    tile_size: null
    stride: null
    remove_border_count: 0
    use_random_tiling: False
    random_tile_count: 16

model:
  name: padim
  # backbone: resnet18
  backbone: wide_resnet50_2
  pre_trained: true
  layers:
    - layer1
    - layer2
    - layer3
  normalization_method: min_max # options: [none, min_max, cdf]

metrics:
  image:
    - F1Score
    - AUROC
  pixel:
    - F1Score
    - AUROC
  threshold:
    method: adaptive #options: [adaptive, manual]
    manual_image: null
    manual_pixel: null

visualization:
  show_images: False # show images on the screen
  save_images: True # save images to the file system
  log_images: True # log images to the available loggers (if any)
  image_save_path: null # path to which images will be saved
  mode: full # options: ["full", "simple"]

project:
  seed: 42
  path: ./results

logging:
  logger: [] # options: [comet, tensorboard, wandb, csv] or combinations.
  log_graph: false # Logs the model graph to respective logger.

optimization:
  export_mode: null # options: torch, onnx, openvino

# PL Trainer Args. Don't add extra parameter here.
trainer:
  enable_checkpointing: true
  default_root_dir: null
  gradient_clip_val: 0
  gradient_clip_algorithm: norm
  num_nodes: 1
  devices: 1
  enable_progress_bar: true
  overfit_batches: 0.0
  track_grad_norm: -1
  check_val_every_n_epoch: 1 # Don't validate before extracting features.
  fast_dev_run: false
  accumulate_grad_batches: 1
  max_epochs: 1
  min_epochs: null
  max_steps: -1
  min_steps: null
  max_time: null
  limit_train_batches: 1.0
  limit_val_batches: 1.0
  limit_test_batches: 1.0
  limit_predict_batches: 1.0
  val_check_interval: 1.0 # Don't validate before extracting features.
  log_every_n_steps: 50
  accelerator: cpu # <"cpu", "gpu", "tpu", "ipu", "hpu", "auto">
  strategy: null
  sync_batchnorm: false
  precision: 32
  enable_model_summary: true
  num_sanity_val_steps: 0
  profiler: null
  benchmark: false
  deterministic: false
  reload_dataloaders_every_n_epochs: 0
  auto_lr_find: false
  replace_sampler_ddp: true
  detect_anomaly: false
  auto_scale_batch_size: false
  plugins: null
  move_metrics_to_cpu: false
  multiple_trainloader_mode: max_size_cycle
batch_size や num_workers は適宜設定してください。
学習の実行
学習は以下のコマンドで実行できます。
python .\tools\train.py --model padim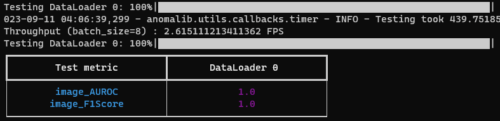
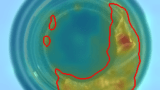
最後に結果が表示されます。
結果の確認
結果の確認は、以下のコマンドで実行可能です。
python tools/inference/lightning_inference.py --config src/anomalib/models/padim/config.yaml --weights results/padim/custom/run/weights/lightning/model.ckpt --input .\datasets\MVTec\custom\test\defect\1.png --output results/padim/custom/test結果は、results/padim/custom/test/defect に保存されます。
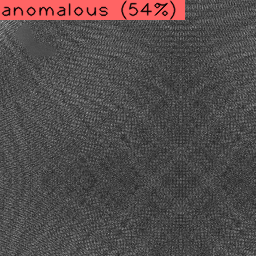
54% の確率ですが、正解していますね。
おわりに
今回は anomalib をカスタムデータで学習させる方法について説明しました。
次回は、推論プログラムを改良して使いやすくしていきます。

コメント