
はじめに
前回の記事では、Gazebo 上のカメラを取得し、障害物回避を実装しました。

今回はSLAM (自己位置推定) に向けて、追加ファイルの作成及び、Launch ファイルの変更をしていきます。
前提条件
前提条件は、以下の通りです。
- URDF の作成が完了している (URDFを作成する記事はこちらです)
Localization の方法
Localization and Mapping は、「自分が地図上のどこにいるか」を推定します。
Localization は 「自分がどこにいるか」を推定しますが、地図がないので「どこ」なのか分かりません。そこで、「開始位置からどの方向にどれだけ進んだか」を推定します。
Localization の推定方法
「開始位置からどの方向にどれだけ進んだか」の推定方法として
- ディファレンシャルドライブの軌跡から推定する
- IMU のデータから推定する
上記2つの方法が、今回のロボットの Localization の方法となりますが、今回は
- ディファレンシャルドライブと IMU のデータを融合して推定
をやっていきます。
センサ融合について
センサ融合の説明をします。
詳細な数式を用いての説明は今回はしません (できません)
残念ながら、私個人の認識です・・・。
簡単に言うと、ディファレンシャルドライブと IMU から得られるロボットの位置の推定値にはばらつきがあります。そこで、両者のデータ間の信頼度に応じて推定値を融合します。
信頼度は、共分散で表されます。両者のデータ間のばらつきです。
この共分散が正規分布に従うとして、正規分布の重なりの度合いが、高ければ高いほど、推定値が確かなもである。という考えでセンサを融合します。
センサ融合の追加処理
センサ融合は上記の手順で処理されますが、今のままでは
- 時系列が考慮されていない
という問題があります。
現状では、推定値がある瞬間だけ異常値になってしまうと、ロボットが瞬間移動したことになってしまいます。
そこで、拡張カルマンフィルタを用いて、「どこから」「どこへ」移動したのかを時系列を考慮して推定することができます。
詳しくは本やネットで調べてみてください。
Localization 用センサ融合の実装
早速、実装をしていきます。こちらのページを参考に進めています。
まずは、いつものワークスペースへ移動し、センサ融合の設定ファイルを作成します。
cd ~/ros_ws/src/ros2_first_test
mkdir config
touch config/first_ekf.yaml
code .
今作成した first_ekf.yaml に以下のコードを記述します。これもこちらにあります。
### ekf config file ###
ekf_filter_node:
    ros__parameters:
# The frequency, in Hz, at which the filter will output a position estimate. Note that the filter will not begin
# computation until it receives at least one message from one of theinputs. It will then run continuously at the
# frequency specified here, regardless of whether it receives more measurements. Defaults to 30 if unspecified.
        frequency: 30.0

# ekf_localization_node and ukf_localization_node both use a 3D omnidirectional motion model. If this parameter is
# set to true, no 3D information will be used in your state estimate. Use this if you are operating in a planar
# environment and want to ignore the effect of small variations in the ground plane that might otherwise be detected
# by, for example, an IMU. Defaults to false if unspecified.
        two_d_mode: false

# Whether to publish the acceleration state. Defaults to false if unspecified.
        publish_acceleration: true

# Whether to broadcast the transformation over the /tf topic. Defaultsto true if unspecified.
        publish_tf: true

# 1. Set the map_frame, odom_frame, and base_link frames to the appropriate frame names for your system.
#     1a. If your system does not have a map_frame, just remove it, and make sure "world_frame" is set to the value of odom_frame.
# 2. If you are fusing continuous position data such as wheel encoder odometry, visual odometry, or IMU data, set "world_frame"
#    to your odom_frame value. This is the default behavior for robot_localization's state estimation nodes.
# 3. If you are fusing global absolute position data that is subject to discrete jumps (e.g., GPS or position updates from landmark
#    observations) then:
#     3a. Set your "world_frame" to your map_frame value
#     3b. MAKE SURE something else is generating the odom->base_link transform. Note that this can even be another state estimation node
#         from robot_localization! However, that instance should *not* fuse the global data.
        map_frame: map              # Defaults to "map" if unspecified
        odom_frame: odom            # Defaults to "odom" if unspecified
        base_link_frame: base_footprint  # Defaults to "base_link" ifunspecified
        world_frame: odom           # Defaults to the value of odom_frame if unspecified

        odom0: first_robot/odom
        odom0_config: [true, true, false,       # position of xyz
                       false, false, true,     # angle of rpy
                       true, true, false,      # velocity of xyz
                       false, false, true,      # angular velocity of rpy
                       true, true, false,]     # acceleraion of xyz

        imu0: first_robot/imu
        imu0_config: [true, true, false,       # position of xyz
                       false, false, true,     # angle of rpy
                       true, true, false,      # velocity of xyz
                       false, false, true,      # angular velocity of rpy
                       true, true, false]     # acceleraion of xyz
順に説明していきます。
ekf_filter_node:
    ros__parameters:
        frequency: 30.0
ekf_filter_node は ROS2 上でのノード名となります。
ros_parameters 以降で細かい設定をしていきます。
frequency: 30.0 は、出力周期です。今回は 30Hz で出力させます。
two_d_mode: false
publish_acceleration: true
publish_tf: true
two_d_mode は地面の変化を無視する場合、true にします。要は、2次元平面の情報しか使用しないという設定を行います。今回はひとまず false としておきます。
publish_acceleration は加速度の値を出力するかどうか選択します。
publish_tf は tf を出力するかどうか選択します。
map_frame: map              # Defaults to "map" if unspecified
odom_frame: odom            # Defaults to "odom" if unspecified
base_link_frame: base_footprint  # Defaults to "base_link" ifunspecified
world_frame: odom           # Defaults to the value of odom_frame if unspecified
これらは ekf_filter_node が出力する topic 名を設定する項目です。
今回はそのまま使用します。
odom0: first_robot/odom
    odom0_config: [true, true, false,       # position of xyz
                  false, false, true,     # angle of rpy
                   true, true, false,      # velocity of xyz
                   false, false, true,      # angular velocity of rpy
                   true, true, false,]     # acceleraion of xyz
odom0 は 0 番目の オドメトリセンサです。今回は first_robot/odom の topic を使用します。
odom0_config は オドメトリの設定を行います。
1 行目は x, y, z, の位置の推定値を出力するかどうか選択します。以降も同様の設定です。
今回は、
- x, y 方向の 位置、速度、加速度
- ヨー角の 角度、角速度
を出力します。
imu0: first_robot/imu
    imu0_config: [true, true, false,       # position of xyz
                  false, false, true,     # angle of rpy
                  true, true, false,      # velocity of xyz
                  false, false, true,      # angular velocity of rpy
                  true, true, false]     # acceleraion of xyz
imu0 は 0 番目の IMU センサです。今回は first_robot/imu の topic を使用します。
imu0_config は IMU の設定を行います。
1 行目は x, y, z, の位置の推定値を出力するかどうか選択します。以降も同様の設定です。
今回は、
- x, y 方向の 位置、速度、加速度
- ヨー角の 角度、角速度
を出力します。
Localization launch ファイルの作成
センサ融合を実装したので、次は、first_ekf.yaml を起動する launch ファイルを作成します。
cd ~/ros_ws/src/ros2_first_test
touch launch/first_localization.launch.py
first_localization.launch.py の中身は以下のように変更してください。
import os
from ament_index_python.packages import get_package_share_directory
import launch
from launch import LaunchDescription
from launch_ros.actions import Node
from launch.substitutions import LaunchConfiguration

def generate_launch_description():

    package_dir = get_package_share_directory("ros2_first_test")
    urdf = os.path.join(package_dir, "urdf" , "first_robot.urdf")
    rviz = os.path.join(package_dir, "rviz" , "first_robot.rviz")
    ekf_path = os.path.join(package_dir, "config", 'first_ekf.yaml')
    use_sim_time = LaunchConfiguration('use_sim_time', default='true')

    return LaunchDescription([
        launch.actions.DeclareLaunchArgument(name='gui', default_value='True',
                                             description='Flag to enable joint_state_publisher_gui'),

        Node(
            package='robot_state_publisher',
            executable='robot_state_publisher',
            name='robot_state_publisher',
            output='screen',
            arguments=[urdf],
            ),

        Node(
            package='joint_state_publisher',
            executable='joint_state_publisher',
            name='joint_state_publisher',
            arguments=[urdf],
            ),

        Node(
            package='robot_localization',
            executable='ekf_node',
            name='ekf_filter_node',
            output='screen',
            parameters=[ekf_path, {'use_sim_time': use_sim_time}]),

        # gazebo settings
        launch.actions.ExecuteProcess(
            cmd=["gazebo", "--verbose", '-s', 'libgazebo_ros_init.so', "-s", "libgazebo_ros_factory.so"],
            ),

        Node(
            package="gazebo_ros",
            executable="spawn_entity.py",
            name="urdf_spawner",
            parameters=[{'use_sim_time': use_sim_time}],
            arguments=["-topic", "/robot_description", "-entity", "first_robot"],
            ),

        Node(
            package="rviz2",
            executable="rviz2",
            name="rviz2",
            arguments=["-d", rviz]
            ),
    ])
詳細は次回に回します。今回はとりあえず、起動するところまで進めていきます。
次に、setup.py の
(os.path.join('share', package_name, 'launch'), glob('launch/*.py')),
(os.path.join('share', package_name, 'urdf'), glob('urdf/*')),
(os.path.join('share', package_name, 'rviz'), glob('rviz/*')),
こちらを
(os.path.join('share', package_name, 'launch'), glob('launch/*.py')),
(os.path.join('share', package_name, 'urdf'), glob('urdf/*')),
(os.path.join('share', package_name, 'rviz'), glob('rviz/*')),
(os.path.join('share', package_name, 'config'), glob('config/*')),
このように変更します。
cd ~/ros_ws
colcon build --packages-select ros2_first_test
source ~/.bashrc
ros2 launch ros2_first_test first_localization.launch.py
Gazebo や Rviz2 が起動したら、別のターミナルを開いて以下のコマンドを入力してください。
ros2 node info /ekf_filter_node以下のように /ekf_filter_node の詳細が出力されていれば、設定は完了です。
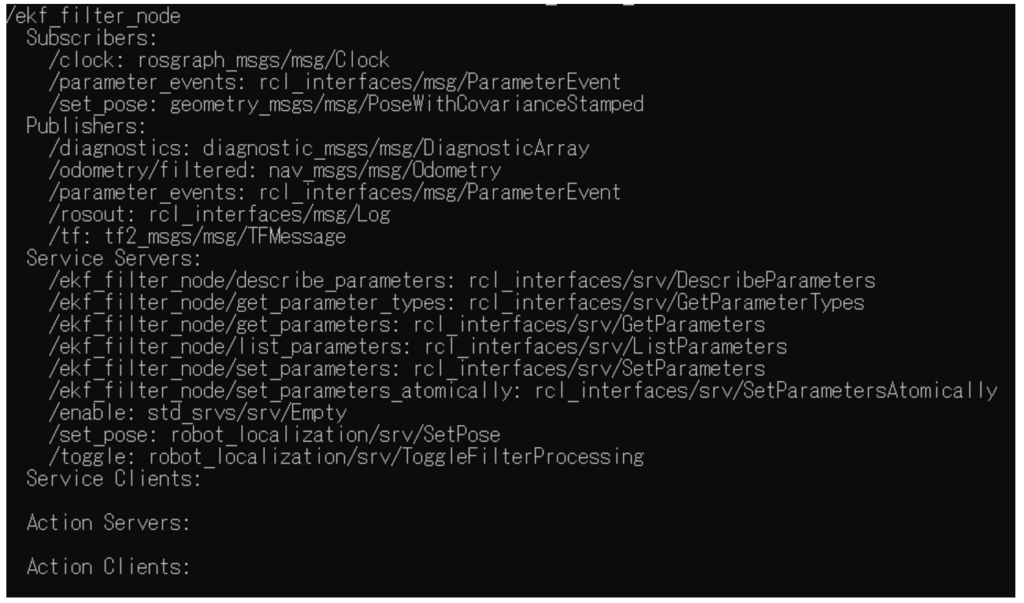
/ekf_filter_node が出力している topic を取得してみると色々な情報を眺めることができます。
正常に設定できたかどうか確認するには、
ros2 topic echo /odometry/filteredを、実行してみてください。
おわりに
以上が Localization の実装となります。
シミュレーション上ではノイズを 0 にすることでセンサ融合の必要はなくなりますが、より現実に近いシミュレーションをする方が、実装したときにシミュレーションとの乖離を修正しなくて済みます。
launch ファイルの詳細な設定や Gazebo 上での挙動についての説明は次回にします。


コメント