はじめに
前回はページ遷移の方法について説明しました。
今回は、ポップアップの表示方法について説明します
前提条件
前提条件は以下の通りです。
- Python がインストールされている
- Windows11 (Ubuntuでも可?)
- Kivy[full] がインストールされている
ポップアップ
GUI 操作に誤りがある場合や、入力値が不足している場合にポップアップを表示する必要があります。
Kivy の Popup に関する公式ページはこちらです。
py ファイルでレイアウトを作成する場合
python プログラム上でレイアウトを管理したい場合についてのコードを示します。
kv ファイル
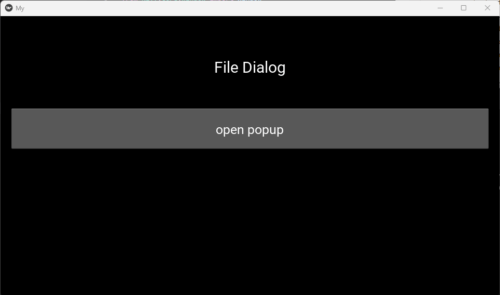
<MainWidget>:
    orientation: 'vertical'
    padding: [20, 20]
    Label:
        text: "File Dialog"
        size_hint: 1.0, 0.3
        font_size: 30
    Button:
        text: 'open popup'
        on_release: root.popup_open()
        size_hint: 1.0, 0.15
        font_size: 25
    Label:
        id: label1
        text: ""
        size_hint: 1.0, 0.50
py ファイル
from kivy.app import App
from kivy.lang.builder import Builder
Builder.load_file('test_4.kv')
from kivy.core.window import Window
Window.size = (960, 540)
from kivy.uix.boxlayout import BoxLayout
from kivy.uix.popup import Popup
from kivy.uix.label import Label
from kivy.uix.button import Button
class MainWidget(BoxLayout):
def popup_open(self):
content = BoxLayout(orientation="vertical")
content.add_widget(Label(text="this is popup"))
content_close = Button(text="close")
content.add_widget(content_close)
popup = Popup(title='Test popup',
content=content,
size_hint=(None, None), size=(400, 400))
content_close.bind(on_release=popup.dismiss)
popup.open()
class MyApp(App):
def build(self):
return MainWidget()
if __name__ == '__main__':
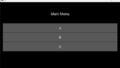
MyApp().run()上記を実行すると、以下のようなポップアップが得られます。
open popup をクリックしてください
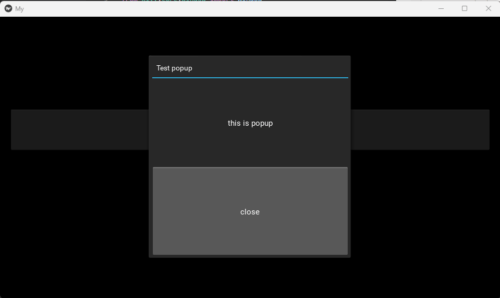
ボタン付きのポップアップが作成されました。
kv ファイルでレイアウトを作成する場合
kv ファイルでレイアウトを作成することも可能ですが、popup.dismiss だけは Popup宣言関数内でバインドする必要があります。
kv ファイル
<MainWidget>:
    orientation: 'vertical'
    padding: [20, 20]
    Label:
        text: "File Dialog"
        size_hint: 1.0, 0.3
        font_size: 30
    Button:
        text: 'open popup'
        on_release: root.custom_popup()
        size_hint: 1.0, 0.15
        font_size: 25
    Label:
        id: label1
        text: ""
        size_hint: 1.0, 0.50

<CustomPopup>:
    orientation: "vertical"
    Label:
        text:'aaaaa'
    Button:
        text:"bbbbbb"
py ファイル
from kivy.app import App
from kivy.lang.builder import Builder
Builder.load_file('test_4.kv')
from kivy.core.window import Window
Window.size = (960, 540)
from kivy.uix.boxlayout import BoxLayout
from kivy.uix.popup import Popup
from kivy.uix.label import Label
from kivy.uix.button import Button
class CustomPopup(BoxLayout):
pass
class MainWidget(BoxLayout):
def popup_open(self):
content = BoxLayout(orientation="vertical")
content.add_widget(Label(text="this is popup"))
content_close = Button(text="close")
content.add_widget(content_close)
popup = Popup(title='Test popup',
content=content,
size_hint=(None, None), size=(400, 400))
content_close.bind(on_release=popup.dismiss)
popup.open()
def custom_popup(self):
custom_content = CustomPopup()
content_close = Button(text="close")
custom_content.add_widget(content_close)
popup = Popup(title='Test popup',
content=custom_content, auto_dismiss=True,
size_hint=(None, None), size=(400, 400))
content_close.bind(on_release=popup.dismiss)
popup.open()
class MyApp(App):
def build(self):
return MainWidget()
if __name__ == '__main__':
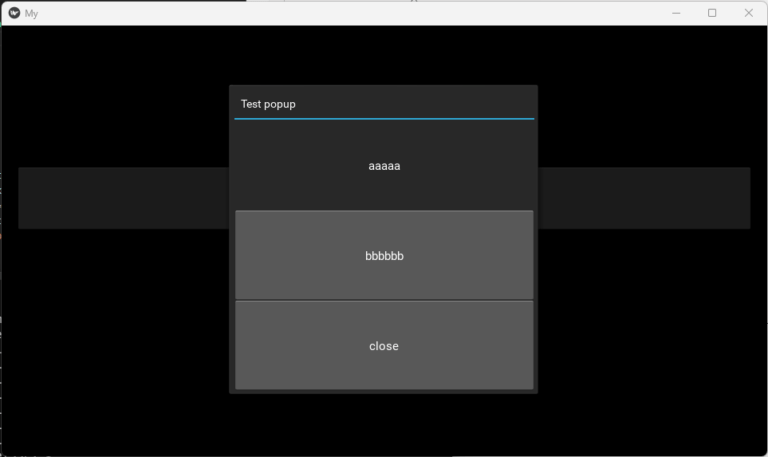
MyApp().run()CustomPopup に Button を add_widget で追加して使用します。
auto_dismiss=True は、ポップアップ以外の部分をクリックした際に、ポップアップを閉じるかどうかを選択できます。 True で有効にします。
上記を実行すると、以下のようなポップアップが表示されます。
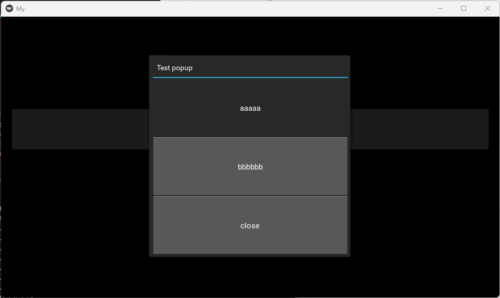
bbbbbb のボタンを押しても何も起こりませんが、close をクリックすると、ポップアップが閉じます。
おわりに
今回はポップアップの表示方法について説明しました。
kv ファイルでレイアウトを指定するか、py ファイルで指定するか自由ですが、レイアウトが複雑になる場合は、kv ファイルで指定した方が無難かと思います。
次回は、ファイルダイアログの作成方法について説明します。
コメント