
はじめに
前回は複雑でない Widget を全て紹介しました。

今回は、前回紹介した Widget の情報を取得・入力する方法について説明します。
前提条件
前提条件は以下の通りです。
- Python がインストールされている
- Windows11 (Ubuntuでも可?)
- Kivy[full] がインストールされている
kv ファイルの作成
kv ファイルは、以下のようになります。
<MyWidget>:
    canvas.before:
        Color:
            rgba: 0.2, 0.2, 0.2, 1
        Rectangle:
            pos: self.pos
            size: self.size
    rows: 6
    cols: 3
    Button:
        id: first_button
        text: 'my first button'
        on_release: root.button_pushed()
    Label:
        id: first_label
        text: 'my first label'
    BoxLayout:
        orientation:"horizontal"
        BoxLayout:
            orientation: "vertical"
        Label:
            text:"checkbox1"
        CheckBox:
            id: checkbox1
            group: "a"
        BoxLayout:
            orientation: "vertical"
        Label:
            text:"checkbox2"
        CheckBox:
            id: checkbox2
            group: "a"
    Image:
        id: first_image
        source: "test_2.png"
        size: self.texture_size
    Slider:
        id: first_slider
        min: 0
        max: 100
        step: 1
        orientation: 'horizontal'
    ProgressBar:
        id: first_bar
        max: 100
        value: 0
    TextInput:
        id: first_text
        text: "TextInput1"
    BoxLayout:
        orientation: "horizontal"
        ToggleButton:
            id: toggle1
            text:'toggle1'
            group: "b"
            state: "normal"
        ToggleButton:
            id: toggle2
            text:'toggle2'
            group: "b"
            state: "down"
    Switch:
        id: first_switch
        active: False
前回紹介していない部分の説明をします。
canvas.before:
    Color:
        rgba: 0.2, 0.2, 0.2, 1
    Rectangle:
        pos: self.pos
        size: self.size
背景色を変更します。元の状態だとチェックボックスが見にくいので、少しグレーがかかった色にしてあります。
Button:
    id: first_button
    text: 'my first button'
    on_release: root.button_pushed()
id は、py ファイルから参照するときの id です。
文字列を入力しないようにしてください。
on_release は、ボタンが押されてから離れたときに実行する関数を指定します。
他にも on_press (押したとき)、on_state (on_press, on_release両方反応)、があります。
on_state は、長押しで操作する場合に使用します。
root.button_pushed() の、root は <MyWidget> を指します。
なので、MyWidget クラスに button_pushed() を作成することで、このボタンの動作を指定することができます。
py ファイルの作成
続いて、py ファイルを作成していきます。
from kivy.app import App
from kivy.uix.gridlayout import GridLayout
from kivy.lang.builder import Builder
Builder.load_file('test_2.kv')

from kivy.core.window import Window
Window.size = (960, 540)

class MyWidget(GridLayout):
    def button_pushed(self):
        print("first button text", self.ids.first_button.text)
        print("first label text", self.ids.first_label.text)
        print("checkbox1 text", self.ids.checkbox1.state)
        print("checkbox2 text", self.ids.checkbox2.state)
        print("image source", self.ids.first_image.source)
        print("slider value", self.ids.first_slider.value)
        print("progress bar", self.ids.first_bar.value)
        print("textbox text", self.ids.first_text.text)
        print("toggle1 state", self.ids.toggle1.state)
        print("toggle2 text", self.ids.toggle2.state)
        print("switch is active", self.ids.first_switch.active)
        print()
        print("input progress bar value = 10...")
        self.ids.first_bar.value += 10
        print("progress bar", self.ids.first_bar.value)

class MyApp(App):
    def build(self):
        return MyWidget()

if __name__ == '__main__':
    MyApp().run()
前回説明できていない部分を説明します。
from kivy.core.window import Window
Window.size = (960, 540)
これは、Window サイズを変更します。
def button_pushed(self):
    print("first button text", self.ids.first_button.text)
    self.ids.first_bar.value += 10
self.ids.(kvファイルのid).(text, value, state, active) で各 Widget の状態を取得できます。
プログレスバーに関しては、値を代入することも可能です。
以上でプログラム作成は完了です。
プログラムの実行
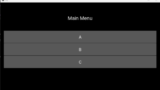
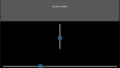
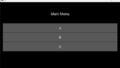
test_2.py と test_2.kv を同じフォルダに移動し、実行します。

上記のような画面が表示されます。
また、button_pushed でバインドされた my first button をクリックすると、ターミナルに
first button text my first button
first label text my first label
checkbox1 text normal
checkbox2 text normal
image source test_2.png
slider value 0.0
progress bar 0.0
textbox text TextInput1
toggle1 state normal
toggle2 text down
switch is active False

input progress bar value = 10...
progress bar 10.0
と表示されます。様々な Widget を触って、上記の出力がどのように変化するか確認してみてください。

おわりに
今回は、各 Widget の状態の取得方法について説明しました
状態取得さえできれば、シングルページアプリ作成はもう簡単ですね。
次回は、ページ遷移の方法について説明します。
コメント