はじめに
前回の記事では、センサ融合と拡張カルマンフィルタを用いて「どの方向にどれだけ進んだかを」把握できるノードを作成しました。
今回は、Gazebo 上で world の作成や、sdf ファイルの作成方法について説明します。
前提条件
前提条件は以下の通りです。
- launch ファイルを用いて Gazebo を起動できる
Gazebo 上にオブジェクトを設置する
まずは、Gazebo上にオブジェクトを配置する方法を説明します。
cd ~/ros_ws/src/ros2_first_test
mkdir world
touch launch/test_gazebo.launch.py
test_gazebo.launch.py に以下の内容にしてください。
import os
from ament_index_python.packages import get_package_share_directory
from launch import LaunchDescription
from launch_ros.actions import Node
from launch.actions import ExecuteProcess
from launch.substitutions import LaunchConfiguration

def generate_launch_description():

    package_dir = get_package_share_directory("ros2_first_test")
    urdf = os.path.join(package_dir, "urdf" , "first_robot.urdf")
    use_sim_time = LaunchConfiguration('use_sim_time', default='true')

    return LaunchDescription([

        Node(
            package='robot_state_publisher',
            executable='robot_state_publisher',
            name='robot_state_publisher',
            arguments=[urdf],
            ),

        Node(
            package='joint_state_publisher',
            executable='joint_state_publisher',
            name='joint_state_publisher',
            arguments=[urdf],
            ),

        # gazebo settings
        ExecuteProcess(
            cmd=["gazebo", "--verbose", "-s", "libgazebo_ros_factory.so"],
            ),

        Node(
            package="gazebo_ros",
            executable="spawn_entity.py",
            name="urdf_spawner",
            parameters=[{'use_sim_time': use_sim_time}],
            arguments=["-topic", "/robot_description", "-entity", "first_robot"],
            ),
    ])
以下のように実行します。
cd ~/ros_ws
colcon build --packages-select ros2_first_test
source ~/.bashrc
ros2 launch ros2_first_test test_gazebo.launch.py
これで、Gazebo が起動します。
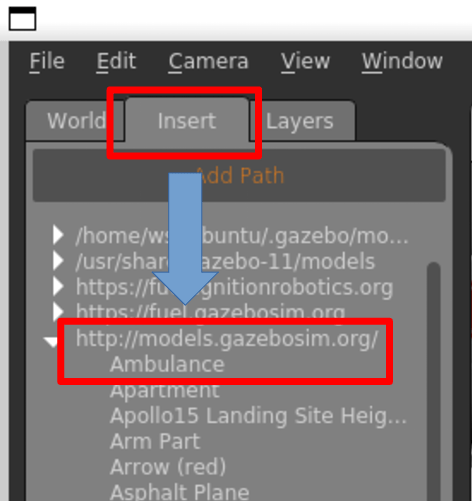
その後、下記画像のように Insertタブ > models.gazebosim > ambulance を選択してください。
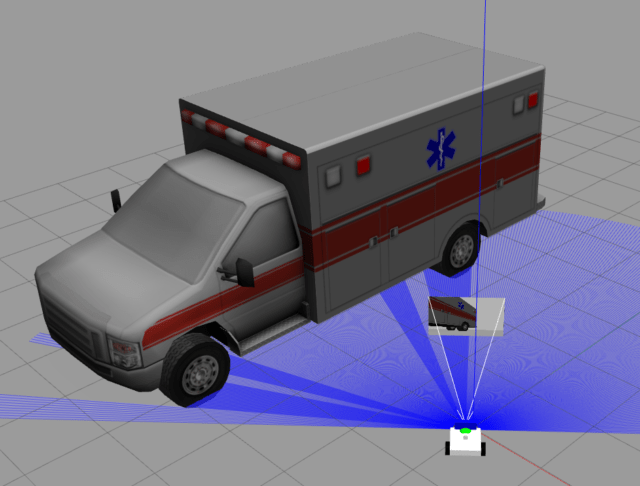
すると、以下のようにGazebo 画面上に救急車が出現します。
以上がオブジェクト設置の方法です。一度、プログラムを終了してください。
次は、実際にLocalization する環境を作成します。
Localization 用 world の作成
続いて、world を作成していきます。
今回は一から作ることはせず、models.gazebosim に既に登録されているモデルを改良して使用します。
ros2 launch ros2_first_test test_gazebo.launch.pyGazebo 上で Insert > models.gazebosim > Cafe を選択してください。
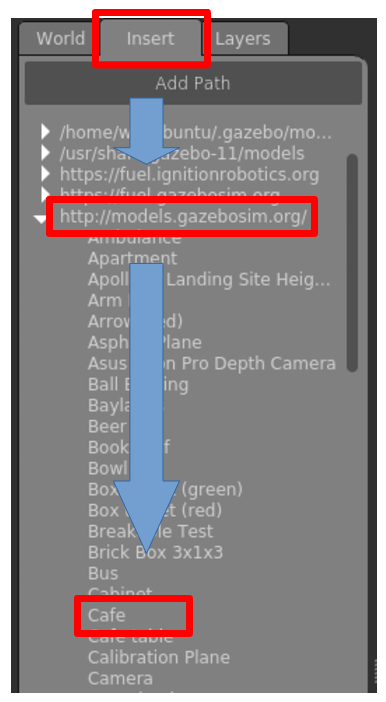
Cafe を選択して、配置すると面白い現象が起こります。
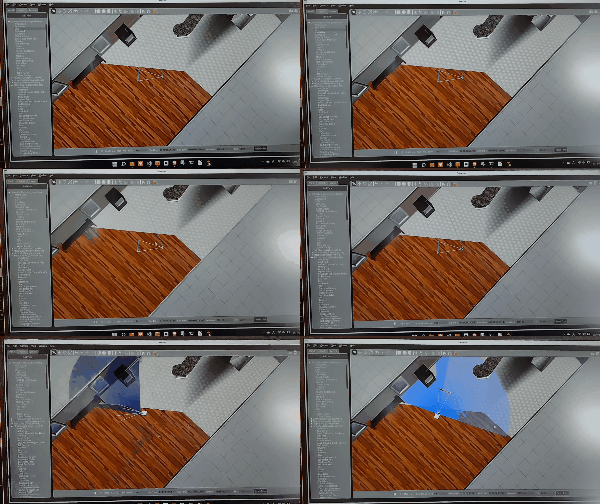
ロボットが軽量過ぎてこのような現象が起きています。
左上の十字ボタンを使用してロボットを中心に戻してやりましょう。

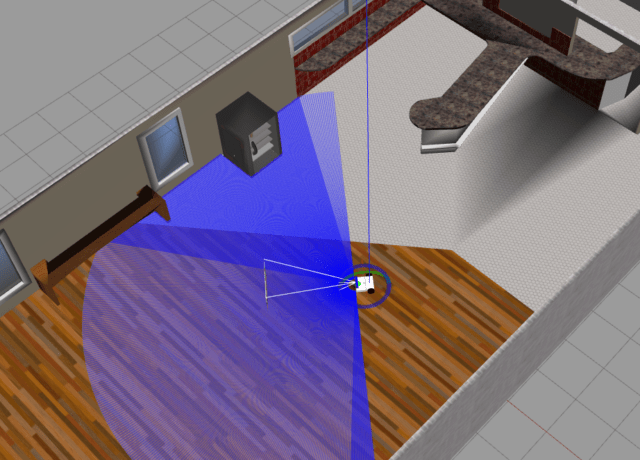
上記のようになれば完了です。
同様の手順で、Cafe ではなく Car wheel を選択して、以下のように適当に配置してください。
同じ個数、同じ位置に配置する必要はまったくありません。
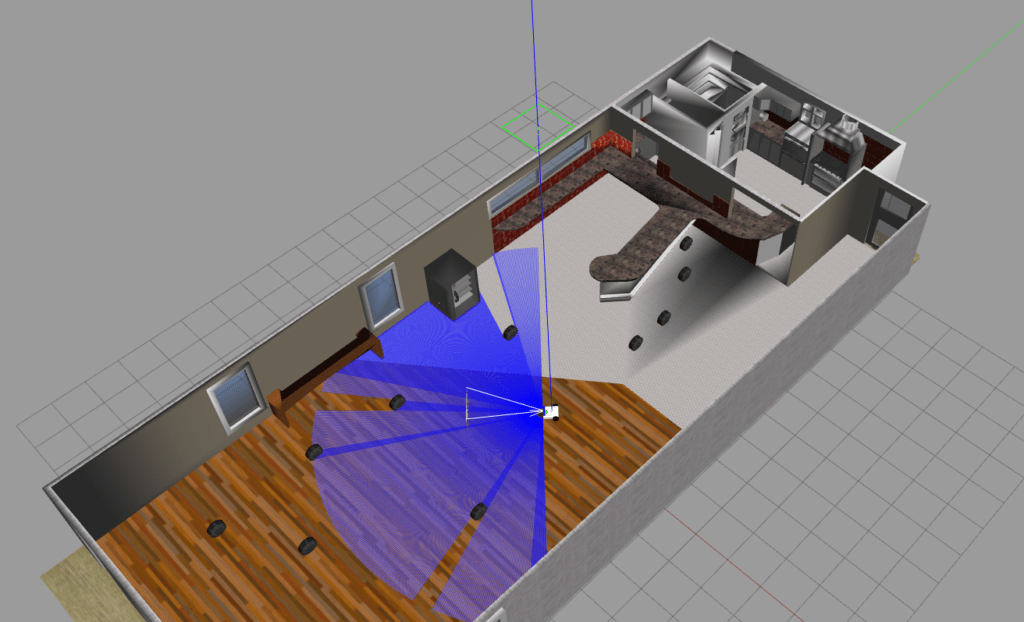
左上の File > Save World As から、先ほど作成した world フォルダへ、以下のように .sdf まで入力して保存してください。
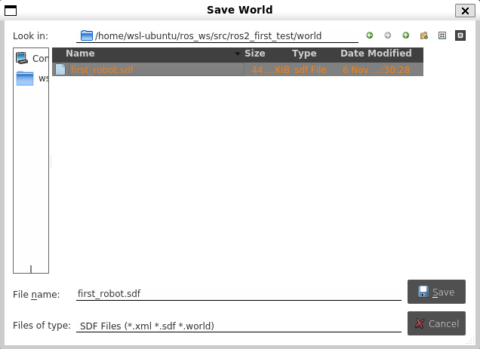
これで、Localization 用の world ファイルの作成が完了しました。
Localization 用 world ファイルの修正
このままでは、配置した Car Wheel が固定されておらず、ロボットと接触すると Car Wheel が移動してしまいます。
そこで、直接 first_robot.sdf を編集します。
VSCode で開いてください。
コード自体が非常に長いので、Ctrl + F で car_wheel と検索してください。
検索結果の 1 件目は、以下の項目がヒットするはずです。
<model name='car_wheel'>
    <link name='link'>
      <pose>0 0 0.21682 0 1.5707 0</pose>
      <inertial>
        <mass>12</mass>
        <inertia>
          <ixx>0.167005</ixx>
          <ixy>0</ixy>
          <ixz>0</ixz>
          <iyy>0.167005</iyy>
          <iyz>0</iyz>
          <izz>0.282065</izz>
        </inertia>
        <pose>0 0 0 0 -0 0</pose>
      </inertial>
      <collision name='collision'>
        <geometry>
          <cylinder>
            <radius>0.21682</radius>
            <length>0.16116</length>
          </cylinder>
        </geometry>
        <surface>
          <friction>
            <ode>
              <mu>1</mu>
              <mu2>1</mu2>
              <fdir1>0 0 1</fdir1>
              <slip1>0</slip1>
              <slip2>0</slip2>
            </ode>
            <torsional>
              <ode/>
            </torsional>
          </friction>
          <contact>
            <ode>
              <min_depth>0.005</min_depth>
              <kp>1e+08</kp>
            </ode>
          </contact>
          <bounce/>
        </surface>
        <max_contacts>10</max_contacts>
      </collision>
      <visual name='visual'>
        <pose>0 0 -0.08058 0 -0 0</pose>
        <geometry>
          <mesh>
            <uri>model://car_wheel/meshes/car_wheel.dae</uri>
          </mesh>
        </geometry>
      </visual>
      <self_collide>0</self_collide>
      <enable_wind>0</enable_wind>
      <kinematic>0</kinematic>
    </link>
    <pose>-3.07572 -2.69107 0 0 -0 0</pose>
  </model>
これらの内容は Gazebo 上で設定されている値です。models.gazebosim からそのまま使用しているので、細かい数値は触らないようにしましょう。
変更箇所は先頭の
<model name='car_wheel'>
    <link name='link'>
上記 <link> の前に、固定するためのコードを入力します。
<model name='car_wheel'>
    <static>1</static>
    <link name='link'>
<static> タグを入力すると、Car_Wheel が固定されます。
これを配置した全ての Car_Wheel に設定してください。
Localization 起動用ファイル作成
上記の設定項目を確認するために、起動用ファイルを作成します。
first_localization.launch.py を以下のように変更してください。
import os
from ament_index_python.packages import get_package_share_directory
import launch
from launch import LaunchDescription
from launch_ros.actions import Node
from launch.substitutions import LaunchConfiguration

def generate_launch_description():

    package_dir = get_package_share_directory("ros2_first_test")
    urdf = os.path.join(package_dir, "urdf" , "first_robot.urdf")
    rviz = os.path.join(package_dir, "rviz" , "first_robot.rviz")
    ekf_path = os.path.join(package_dir, "config", 'first_ekf.yaml')
    use_sim_time = LaunchConfiguration('use_sim_time', default='true')
    world_path = os.path.join(package_dir, 'world', 'first_robot.sdf')

    return LaunchDescription([
        launch.actions.DeclareLaunchArgument(name='gui', default_value='True',
                                             description='Flag to enable joint_state_publisher_gui'),

        Node(
            package='robot_state_publisher',
            executable='robot_state_publisher',
            name='robot_state_publisher',
            output='screen',
            arguments=[urdf],
            ),

        Node(
            package='joint_state_publisher',
            executable='joint_state_publisher',
            name='joint_state_publisher',
            arguments=[urdf],
            ),

        Node(
            package='robot_localization',
            executable='ekf_node',
            name='ekf_filter_node',
            output='screen',
            parameters=[ekf_path, {'use_sim_time': use_sim_time}]),

        # gazebo settings
        #launch.actions.ExecuteProcess(
        #    cmd=["gazebo", "--verbose", "-s", "libgazebo_ros_factory.so"],),
        launch.actions.ExecuteProcess(
            cmd=['gazebo', '--verbose', '-s', 'libgazebo_ros_factory.so', world_path], output='screen'),

        Node(
            package="gazebo_ros",
            executable="spawn_entity.py",
            name="urdf_spawner",
            parameters=[{'use_sim_time': use_sim_time}],
            arguments=["-topic", "/robot_description", "-entity", "first_robot"],
            ),

        Node(
            package="rviz2",
            executable="rviz2",
            name="rviz2",
            arguments=["-d", rviz]
            ),

    ])
変更したのは、world_path 変数で先ほど作成した first_robot.sdf を読み込み、Gazebo 起動時の引数に設定しました。
また、setup.py の以下の部分を変更してください。
(os.path.join('share', package_name, 'launch'), glob('launch/*.py')),
(os.path.join('share', package_name, 'urdf'), glob('urdf/*')),
(os.path.join('share', package_name, 'rviz'), glob('rviz/*')),
(os.path.join('share', package_name, 'config'), glob('config/*')),
                          ↓
(os.path.join('share', package_name, 'launch'), glob('launch/*.py')),
(os.path.join('share', package_name, 'urdf'), glob('urdf/*')),
(os.path.join('share', package_name, 'rviz'), glob('rviz/*')),
(os.path.join('share', package_name, 'config'), glob('config/*')),
(os.path.join('share', package_name, 'world'), glob('world/*')),
以上で準備は完了です。
早速、起動してみましょう。
cd ~/ros_ws
colcon build --packages-select ros2_first_test
source ~/.bashrc
ros2 launch ros2_first_test first_localization.launch.py
以下のように、作成した環境が立ち上がれば完了です。
Gazebo は起動したままにしておいてください。
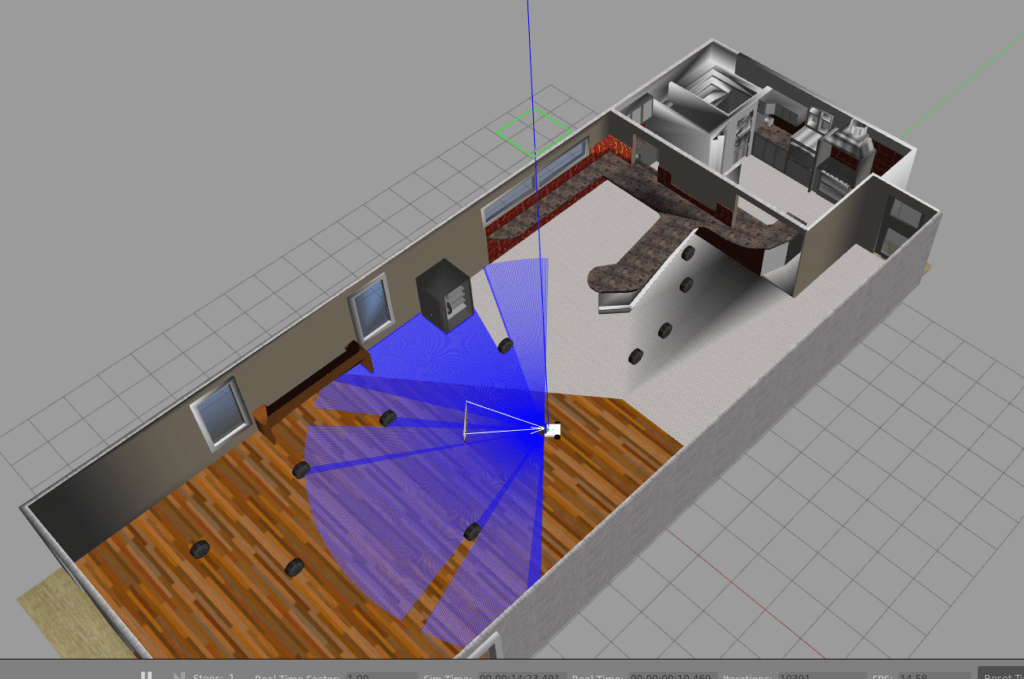
作成した環境でロボットを動かしてみる
作成した環境でロボットを動かしてみましょう。
先ほどの Gazebo を起動したままの状態で、
ros2 run teleop_twist_keyboard teleop_twist_keyboard --ros-args --remap cmd_vel:=/first_robot/cmd_velと入力し、ロボットをタイヤに衝突させてみてください。
動き始めはロボットが多少バタつくかもしれませんが、動かしていれば解消されます。
その後、File > Save World で .sdf ファイルを上書きしてください。
おわりに
今回は Gazebo 上で World ファイルを作成する方法と、その修正方法について説明しました。
もちろん、Gazebo 上で直接編集することもできますが、.sdf ファイルの方が検索もかけられるので、非常に便利だと思います。
次回こそ、Rviz2 上に Map を作成していく方法に行けたらと思います。


コメント