
はじめに
前回は realsense を動かす Python のベースプログラムを作成しました。

今回は、カメラのズレ補正や背景削除について説明していきます。
前提条件
前提条件は以下の通りです。
- pyrealsense2 がインストールされている
- OpenCV ==4.6.0
- Python == 3.9.13
今回はこちらの公式ページを参考に進めていきます。
コード掲載と起動
今回使用するコードはこちらを参考にしました。
## License: Apache 2.0. See LICENSE file in root directory.
## Copyright(c) 2017 Intel Corporation. All Rights Reserved.

#####################################################
##              Align Depth to Color               ##
#####################################################

# First import the library
import pyrealsense2 as rs
# Import Numpy for easy array manipulation
import numpy as np
# Import OpenCV for easy image rendering
import cv2

# Create a pipeline
pipeline = rs.pipeline()

# Create a config and configure the pipeline to stream
#  different resolutions of color and depth streams
config = rs.config()

# Get device product line for setting a supporting resolution
pipeline_wrapper = rs.pipeline_wrapper(pipeline)
pipeline_profile = config.resolve(pipeline_wrapper)
device = pipeline_profile.get_device()
device_product_line = str(device.get_info(rs.camera_info.product_line))

found_rgb = False
for s in device.sensors:
    if s.get_info(rs.camera_info.name) == 'RGB Camera':
        found_rgb = True
        break
if not found_rgb:
    print("The demo requires Depth camera with Color sensor")
    exit(0)

config.enable_stream(rs.stream.depth, 640, 480, rs.format.z16, 30)

if device_product_line == 'L500':
    config.enable_stream(rs.stream.color, 960, 540, rs.format.bgr8, 30)
else:
    config.enable_stream(rs.stream.color, 640, 480, rs.format.bgr8, 30)

# Start streaming
profile = pipeline.start(config)

# Getting the depth sensor's depth scale (see rs-align example for explanation)
depth_sensor = profile.get_device().first_depth_sensor()
depth_scale = depth_sensor.get_depth_scale()
print("Depth Scale is: " , depth_scale)

# We will be removing the background of objects more than
#  clipping_distance_in_meters meters away
clipping_distance_in_meters = 1 #1 meter
clipping_distance = clipping_distance_in_meters / depth_scale

# Create an align object
# rs.align allows us to perform alignment of depth frames to others frames
# The "align_to" is the stream type to which we plan to align depth frames.
align_to = rs.stream.color
align = rs.align(align_to)

# Streaming loop
try:
    while True:
        # Get frameset of color and depth
        frames = pipeline.wait_for_frames()
        # frames.get_depth_frame() is a 640x360 depth image

        # Align the depth frame to color frame
        aligned_frames = align.process(frames)

        # Get aligned frames
        aligned_depth_frame = aligned_frames.get_depth_frame() # aligned_depth_frame is a 640x480 depth image
        color_frame = aligned_frames.get_color_frame()

        # Validate that both frames are valid
        if not aligned_depth_frame or not color_frame:
            continue

        depth_image = np.asanyarray(aligned_depth_frame.get_data())
        color_image = np.asanyarray(color_frame.get_data())

        # Remove background - Set pixels further than clipping_distance to grey
        grey_color = 153
        depth_image_3d = np.dstack((depth_image,depth_image,depth_image)) #depth image is 1 channel, color is 3 channels
        bg_removed = np.where((depth_image_3d > clipping_distance) | (depth_image_3d <= 0), grey_color, color_image)

        # Render images:
        #   depth align to color on left
        #   depth on right
        depth_colormap = cv2.applyColorMap(cv2.convertScaleAbs(depth_image, alpha=0.03), cv2.COLORMAP_JET)
        images = np.hstack((color_image, bg_removed))
        images = np.hstack((images, depth_colormap))
        images = cv2.resize(images, (1280, 480))
        cv2.imshow('Align Example', images)
        key = cv2.waitKey(1)
        # Press esc or 'q' to close the image window
        if key & 0xFF == ord('q') or key == 27:
            cv2.destroyAllWindows()
            break
finally:
    pipeline.stop()
上記プログラムを実行すると、以下のような画面が表示されます。
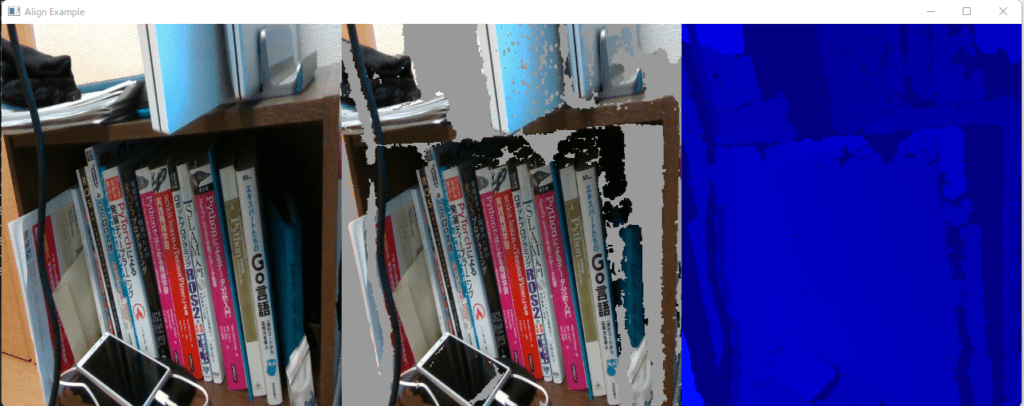
左から BGR画像、背景削除BGR画像、深度BGR画像 となります。
コード説明
背景削除
コード説明に移ります。
前回説明した部分は、飛ばして説明します。
# Getting the depth sensor's depth scale (see rs-align example for explanation)
depth_sensor = profile.get_device().first_depth_sensor()
depth_scale = depth_sensor.get_depth_scale()
print("Depth Scale is: " , depth_scale)
first_depth_sensor() で深度センサのインスタンスを作成します。
get_depth_scale() で、現実の (m) と 深度センサ値 の変換係数を取得します。
詳細はこちらの公式サイトにあります。
# We will be removing the background of objects more than
#  clipping_distance_in_meters meters away
clipping_distance_in_meters = 1 #1 meter
clipping_distance = clipping_distance_in_meters / depth_scale
変換係数を使用して、1(m) / 係数 でクリッピングする深度センサ値を決定します。
bg_removed = np.where((depth_image_3d > clipping_distance) | (depth_image_3d <= 0), grey_color, color_image)np.where() を使用して、1m より遠くのBGR画像を削除することができます。
BGR画像と深度センサ値の整列
# Create an align object
# rs.align allows us to perform alignment of depth frames to others frames
# The "align_to" is the stream type to which we plan to align depth frames.
align_to = rs.stream.color
align = rs.align(align_to)
align の公式サイトの説明はこちらにあります。
BGR画像と深度センサ値を揃えることができます。
# Align the depth frame to color frame
aligned_frames = align.process(frames)
wait_for_frames() で取得した frames に対して整列を実行することができます。
背景削除の効果について
背景削除の効果についてですが、障害物の影まで深度センサは届かないので、背景として削除されてしまいます。

上図の赤枠の部分です。
深度センサ間の距離が限られている以上、赤枠の部分は画像処理ではどうにもなりません。
実運用の際は赤枠のような領域ができないように注意が必要です。
おわりに
今回は、背景削除の方法と、BGR画像と深度画像の整列について説明をしました。
次回は、realsense の他の機能・モードについて説明をする予定です。

コメント